
I recently printed some greeting cards with bird images. A friend looked at these and asked, “Do you crop your photos?” My answer was “Yes, almost always.” What is cropping and why do I do it?
Cropping a photograph means cutting away some of the image from the edges. Most cameras produce images that are rectangular or square. If you cut off material from one or more of the 4 edges, then you have cropped the photo.
Whenever you take a picture, many factors exclude material from the final image. The camera itself eliminates part of a potential image. Camera lenses create a round image. But camera sensors are rectangular or square. So the final photograph omits parts of the round image that was created by the lens. My full-frame digital camera has a sensor that is 35.9mm x 23.9mm. A little high-school geometry reveals that 31% of the circular image is omitted from the rectangular image on the sensor.
Your decisions affect what is in or out of a photo. Most cameras held in their default position (landscape mode) record a picture that is wider than tall. If you turn the camera 90 degrees (portrait mode) this cuts potential image material from the sides and adds material to the top or bottom. If you shift your aim from side-to-side, or up and down, this affects what is captured and what is omitted. If you step toward your subject, you exclude more peripheral material from the photo. If you have a zoom lens and increase the zoom power, you reject more from the final picture. A telephoto lens takes a narrow view, excluding more. Conversely, a wide angle lens includes more.
Cropping, however, refers to excluding some of a photo that has already been taken, either by cutting away part of a negative, trimming off part of a print, or omitting pixels from the edge (or edges) of a digital image.
Why would you crop a picture? Reasons include:
1. You want to change the aspect ratio (width to height ratio) to fit the photo to a frame or a computer monitor or a TV screen. Or you think a particular ratio is more attractive. You can turn a horizontal image into a vertical image.
2. You want to trim away a distracting or unattractive part of an image. For example, you might want to cut out a nearby street sign from a shot of a bird. You might crop to remove an overly bright reflection from the surface of a pond. After a bitter divorce, you might crop your ex-spouse out of your old vacation photographs.
3. You might crop to make a bird bigger in the image that remains.
4. You could crop to center an animal. Or to move the animal to one side.
5. You can crop to give more emphasis to the foreground. Or the background.
In short, you might crop if you think that removing part of the image will make what remains a better photograph for some purpose. Let me show some examples.
Swainson’s Hawk and Northern Mockingbird
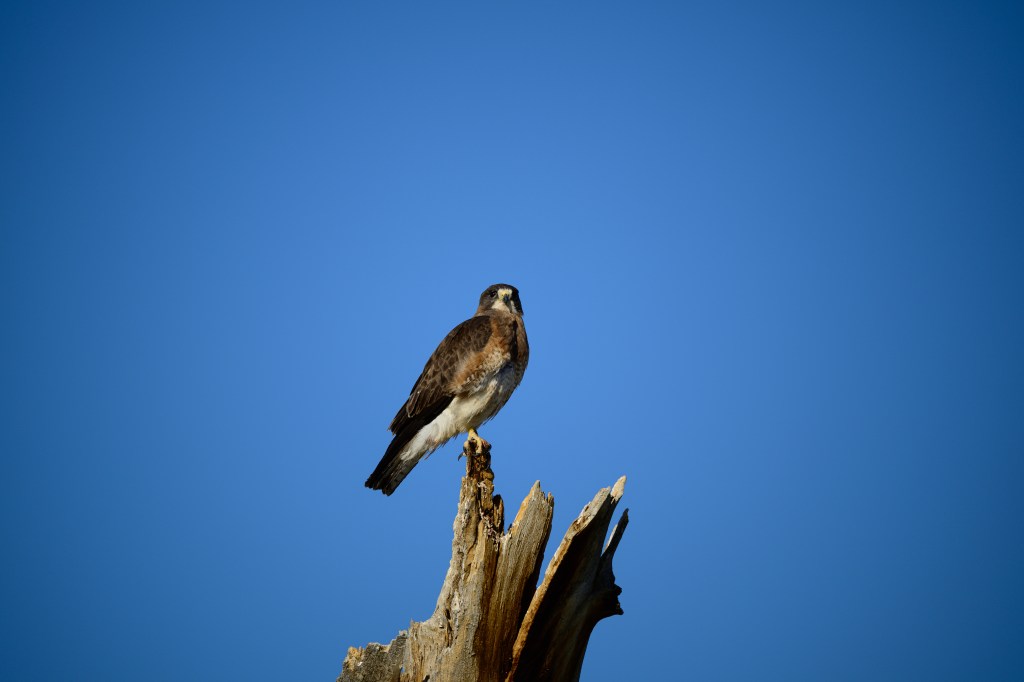
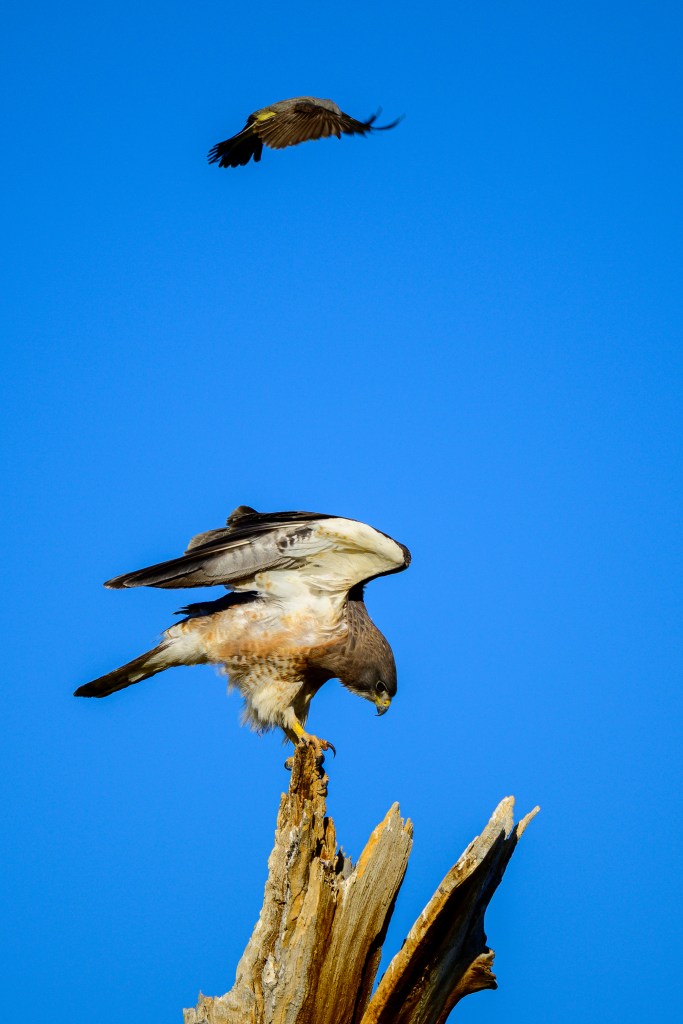
Raptors often perch on the cottonwoods along Warm Springs Road: American Kestrels, Bald Eagles, Prairie Falcons, Peregrine Falcons, and Red-tailed Hawks use this road. In 2025, a few Swainson’s Hawks moved in from South America; one of them favors a dead cottonwood. Shown below is an unedited image taken on July 19. The hawk is in the center of the image; I usually shoot with a bird near the center to be sure the camera’s autofocus is on the bird.
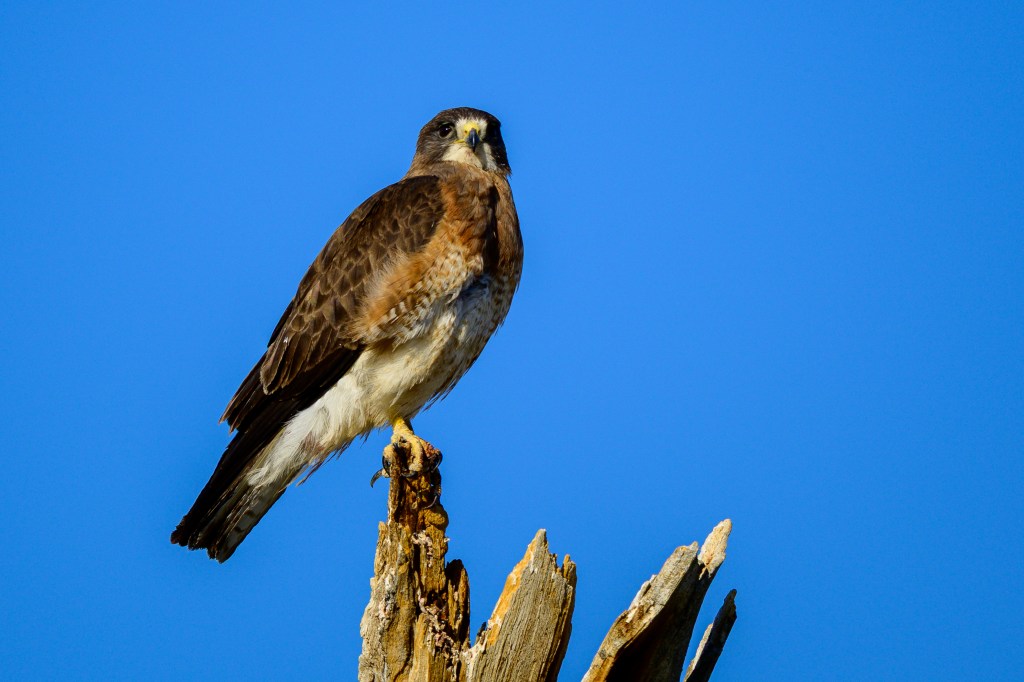
I edited the picture a bit, making adjustments to exposure, and cropping to move the bird to the left, center the dead tree, and remove a lot of blank, boring sky.
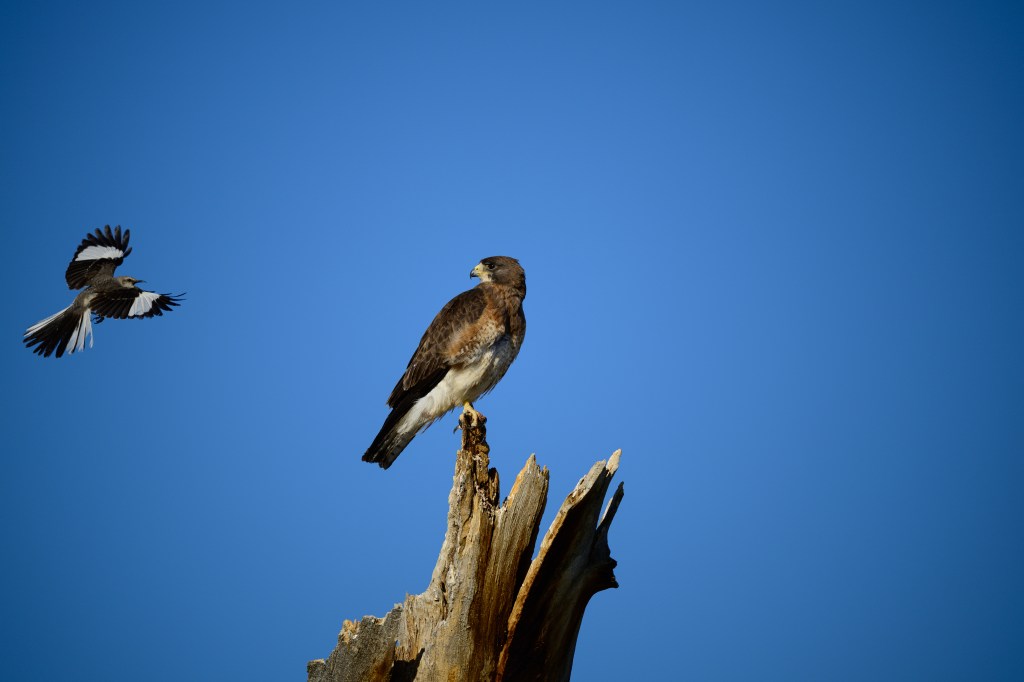
As I was shooting, a Northern Mockingbird appeared, screaming at the hawk; see below. This is a family-oriented blog, so I will not repeat what the Meadowlark was yelling. Now the picture is lopsided; all the action is on the left, while the right side is just empty blue.
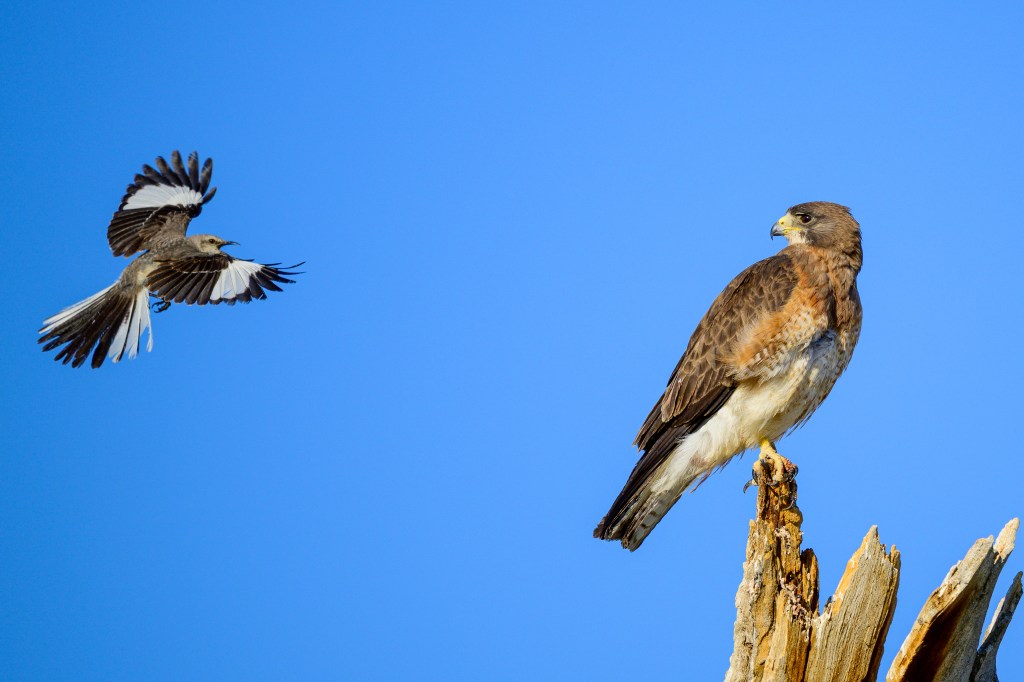
So I redid the crop, keeping the focus on the aggressive interaction, below:
It turns out that just one month earlier, on June 19th, the same Hawk on the same tree was harassed by a Western Kingbird. In the first image, the Hawk ducks and almost takes off. In the second photo, the Kingbird can be seen rocketing past; in that picture, the camera focused on the Meadowlark, leaving the Hawk unfocused. I used cropping to change both of these photos to portrait mode.

Mountain Bluebird
In March, a Mountain Bluebird rocketed past me on Gus Cashbaugh Lane. I tried to shoot this action and was rewarded with a few useful images. The background is blurred by my tracking of the fast bird and the narrow depth of field. Below is one of the images:
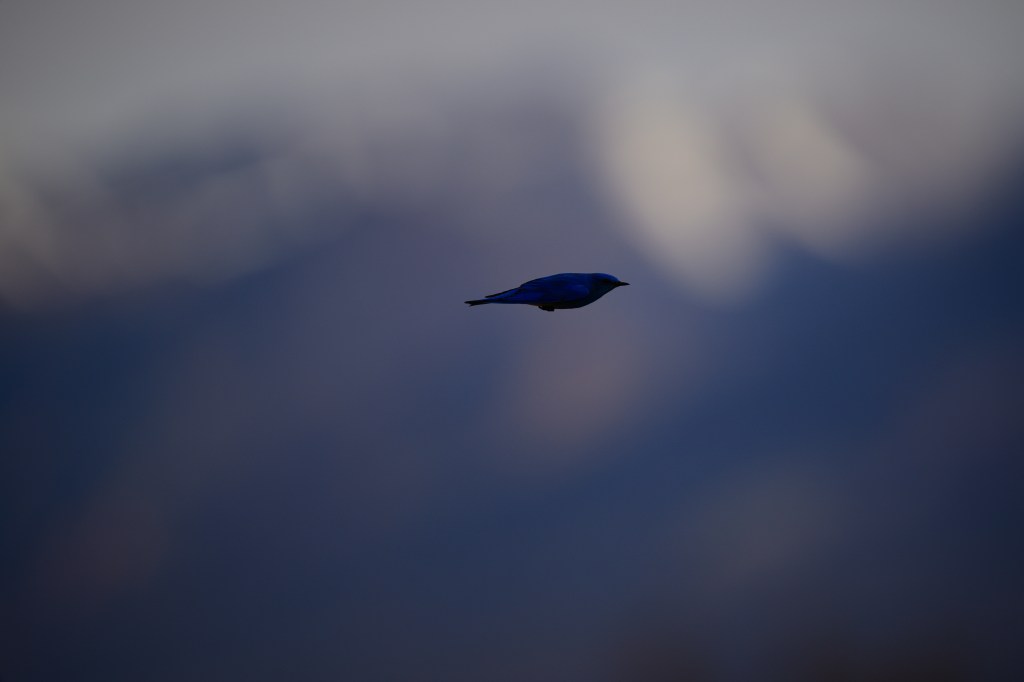
The photo above was underexposed and the bird looks pretty small. But I import my photos into Adobe Lightroom Classic on my computer. The software lets me correct some deficiencies in an image. I increased the amount of light in the photo, particularly in the darker areas. And I cropped away most of the picture to enlarge the bird. I put the bird just a bit above the photo’s center, producing the result below:

Green-tailed Towhee
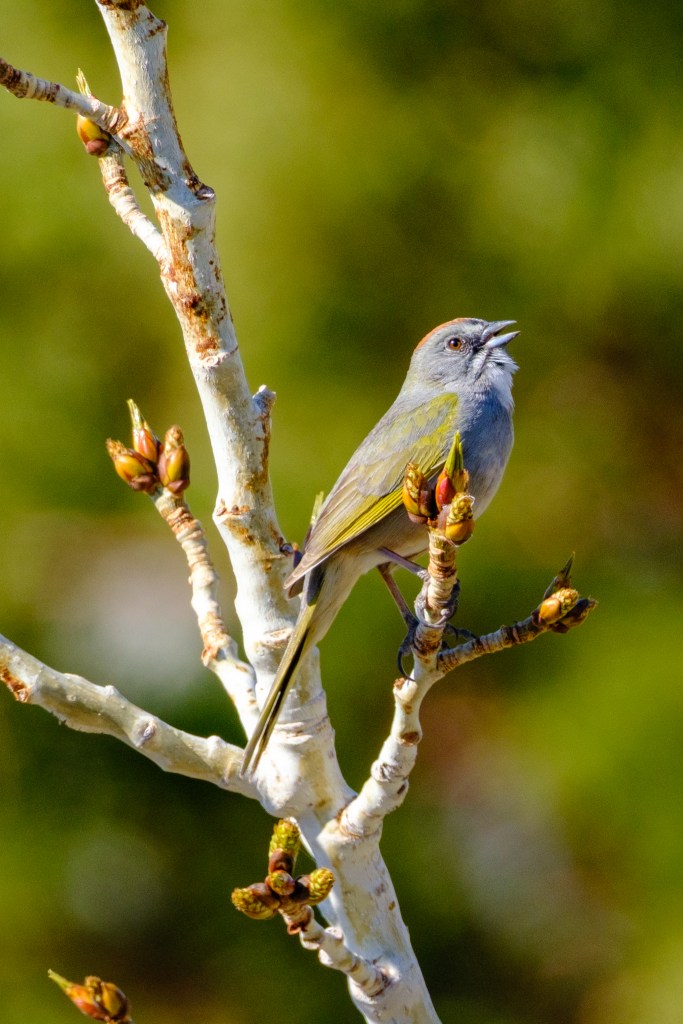
These birds live above Bishop. You can find them in the eastside canyons of the Sierra, such as Lee Vining Creek, McGee, and Convict. On a walk around Convict Lake, I shot the bird below. While I love the buds on the tree, I think the background of unfocused leaves is a bit distracting.

So I cropped away most of the background, and produced the image below for a greeting card. Now the picture is highlights the bird, the branch, and the buds.
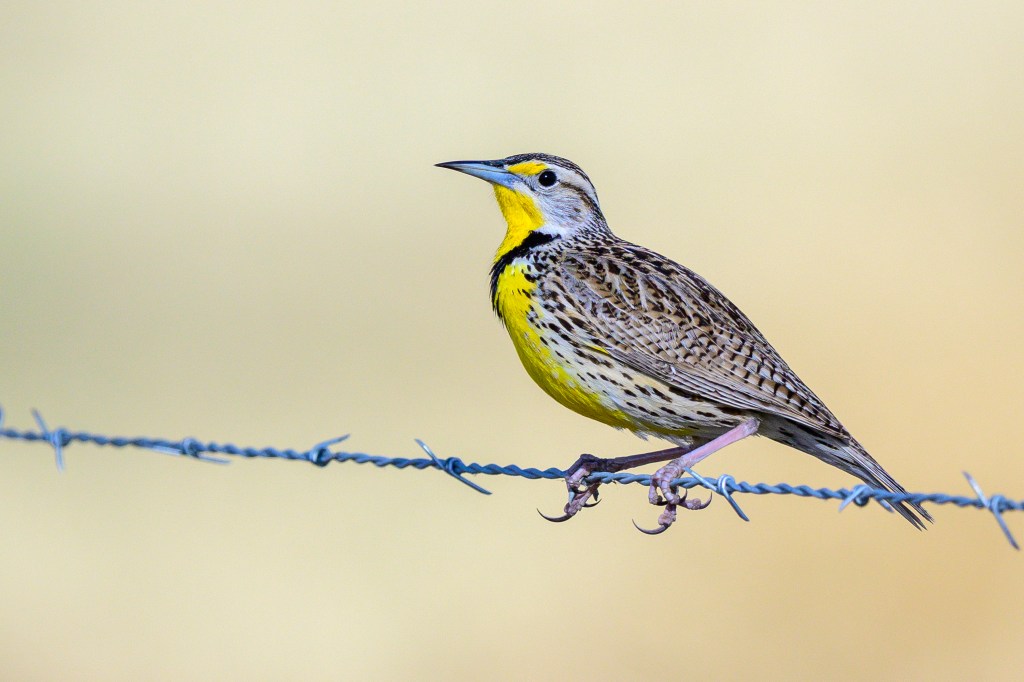
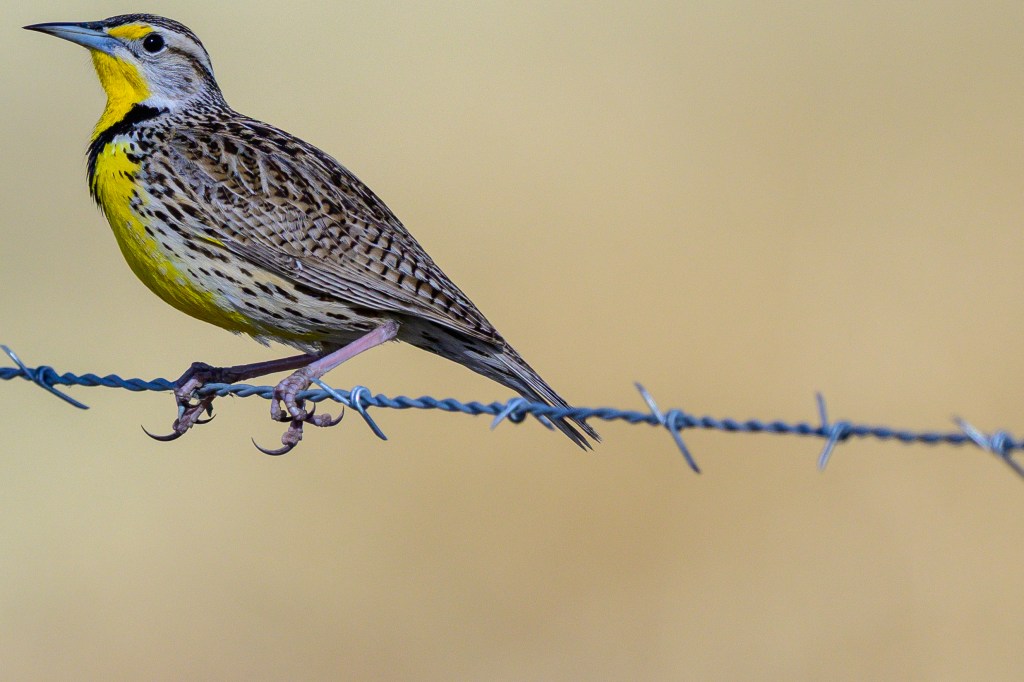
Western Meadowlark
These birds love to belt out a melody. The photo below is underexposed and the bird seems small.
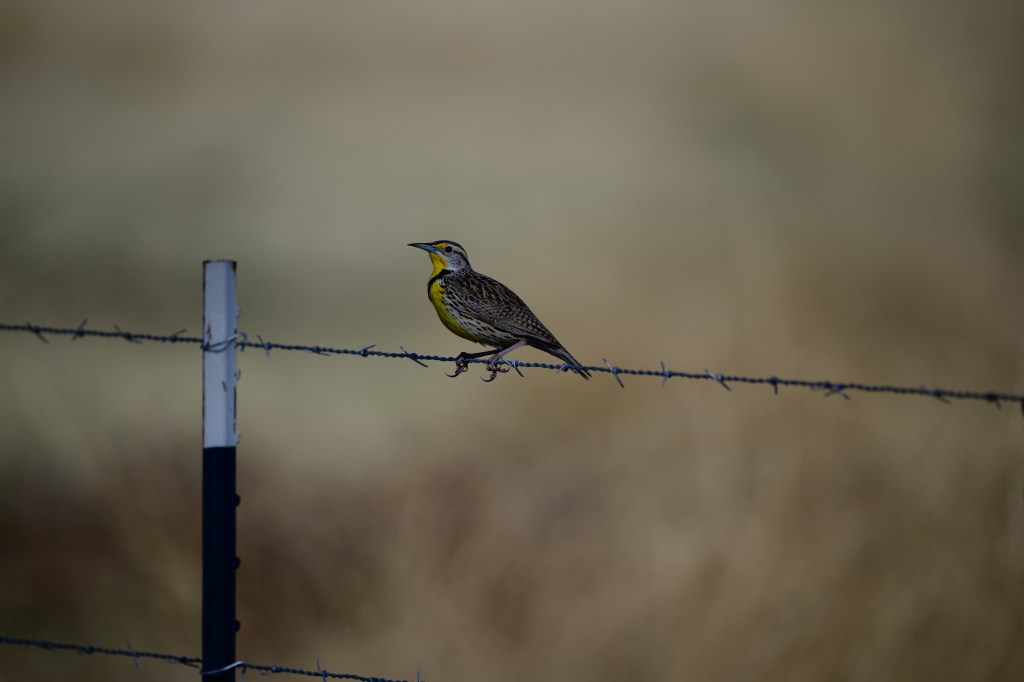
But cropping and some exposure adjustment reveal a lot of detail. I love the way the feet balance on the barbed wire.
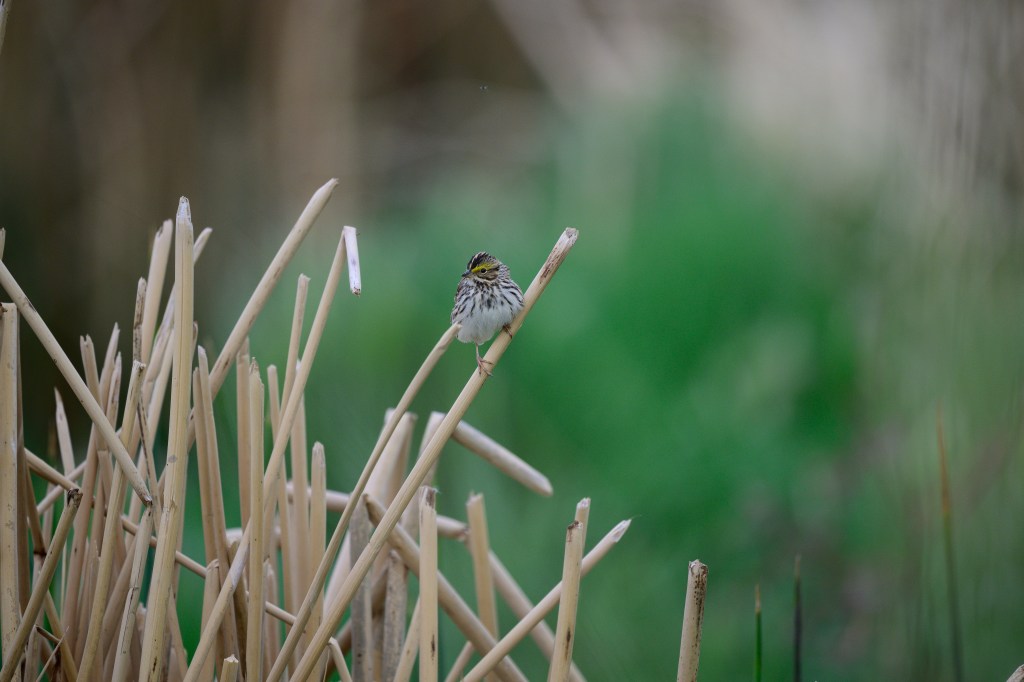
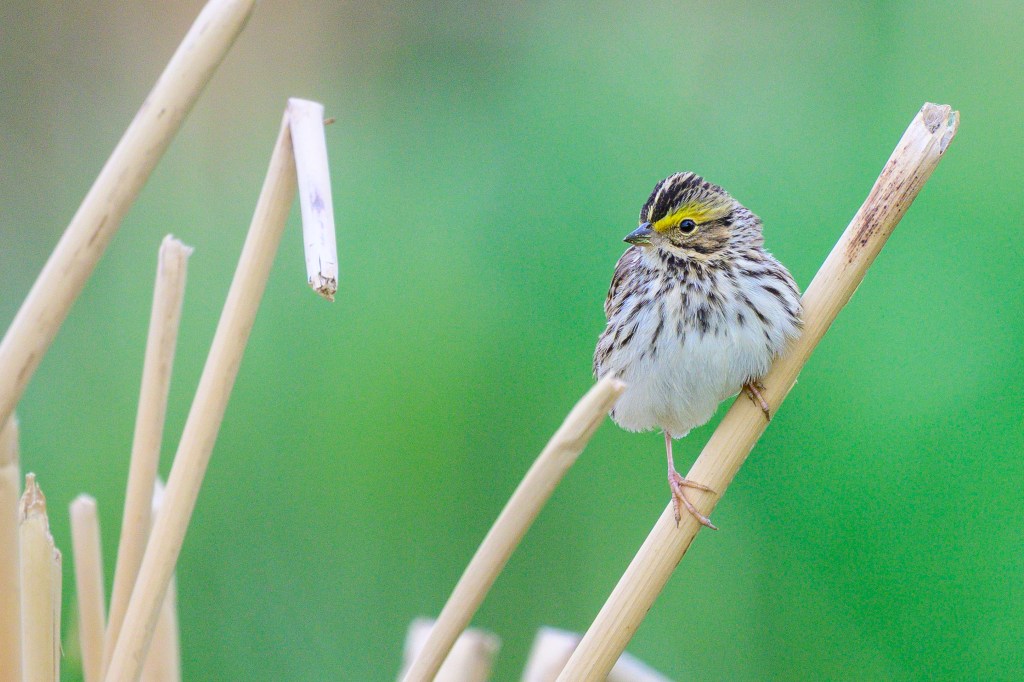
Savannah Sparrow
This sparrow posed on dead reeds along South Airport Road. In the unedited photo, below, he is a little underexposed and it is hard to see details. On a greeting card, using the entire image would produce a minuscule bird.
Making the image brighter and cropping brought out bird details for a card.
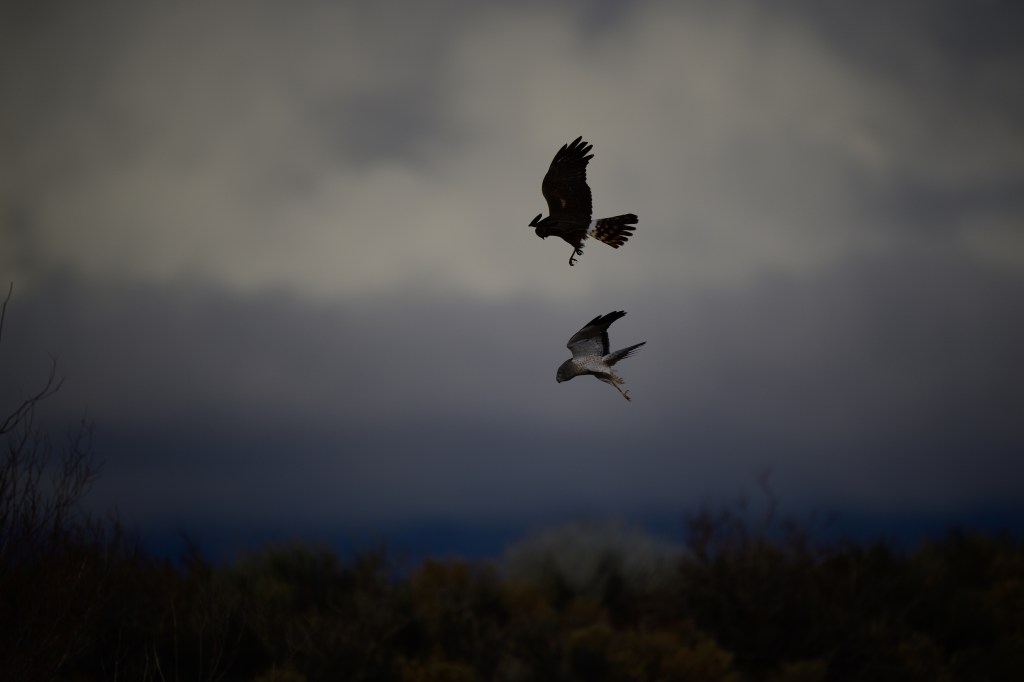
Northern Harriers
Two Northern Harriers, male and female, were hunting at the Buckley Ponds. They crisscrossed the sagebrush, searching for rodents. From time to time their flight paths intersected. I was tracking the female, getting photos like the one below.

Suddenly the male could be seen in the viewfinder. In the photo below, the brown female is on the left, the gray male on the right. This is the initial image, with no editing. The birds are underexposed because of the bright sky and bright clouds in the background.
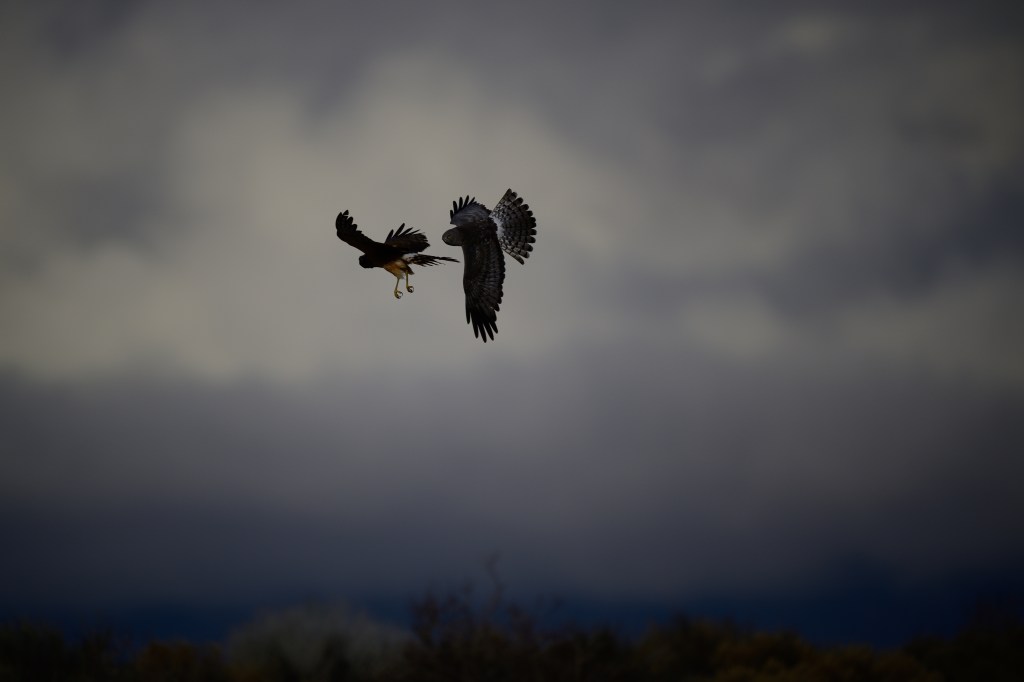
The male came to a stop and fell downward to avoid colliding with his mate. I liked the photo below because both birds are close and positioned so that you can see details of each. But you can see the photo is too dark. The camera underexposed the picture because of the bright background.
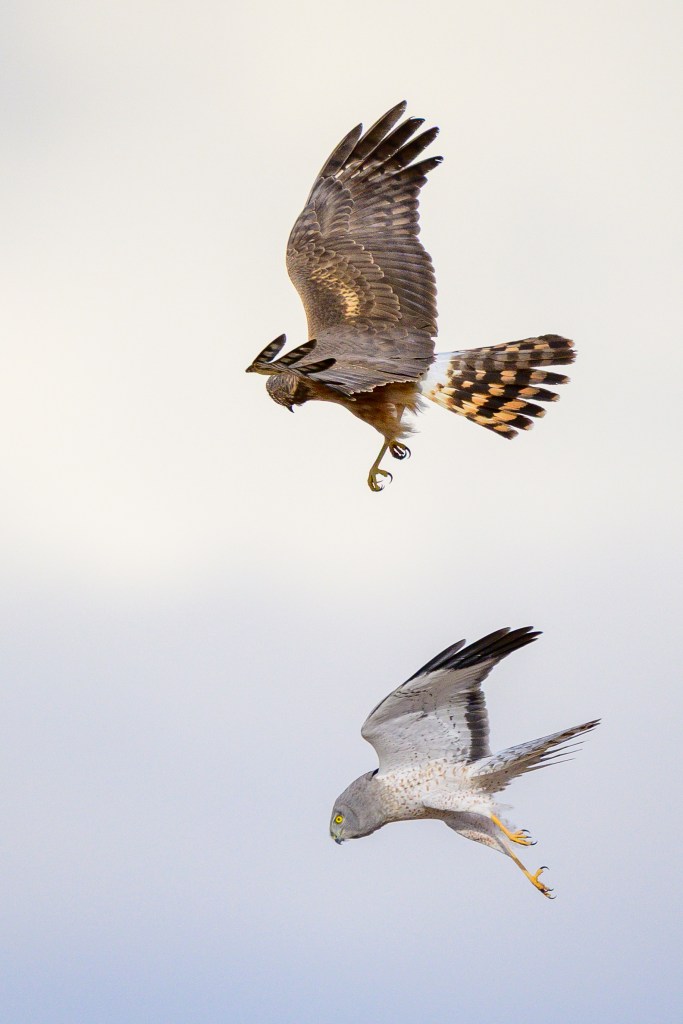
In order to get a better image for a greeting card, I took the following steps:
A. Boosted the overall brightness
B. Toned down the white areas in the birds and clouds
C. Added a little sharpening
D. Trimmed away (cropped) most of the picture, just leaving the birds.
You can see the final result below. The gray-white male is falling to the ground. These acrobatics are child’s play for a Harrier. He recovered easily in the air and jetted away. A real show-boat.
Great Egret
A Great Egret flew by on South Airport Road in May, 2025. A white ghost. By now you know the drill. Initial image, below, is too dark and bird too small.
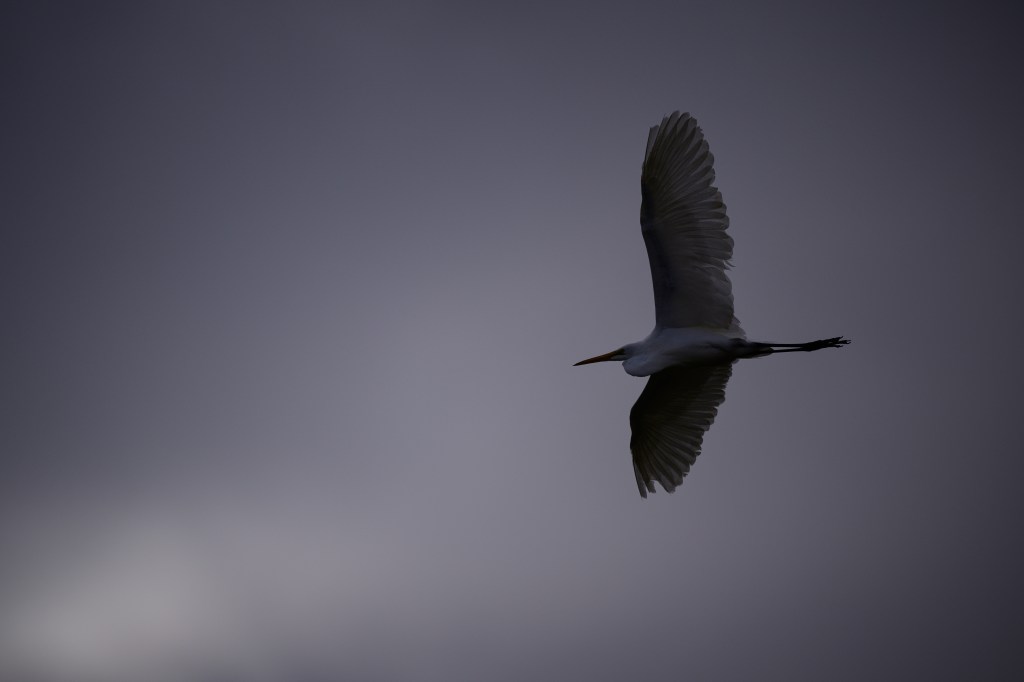
I cropped tightly, leaving just enough space to avoid cutting part of the bird. I usually prefer to leave more room around a bird. And, if possible, show the bird in some kind of context, as I did with the Green-tailed Towhee, shown above. But here I decided to showcase the bird against a featureless white sky. For me, the most interesting features are the wing bones, which can be partly seen though the translucent feathers.

My Approach To Cropping
Now you have seen what cropping can do. Plus adjustments to exposure, shadows, etc. One of the advantages of digital photography is that an amateur with a computer can make all sorts of adjustments and repairs to a digital image. When I photograph a bird, I don’t worry much about composition. I feel I have only a few seconds to capture the image. I put the bird right in the center of the viewfinder and try to get an image that is sharply focused and properly exposed. Some degree of underexposure (too dark) is fine, as this can be easily corrected using software. An overexposed image, however, may be hopeless, as bright areas may have so many fully exposed pixels that no detail can be recovered. Because of this approach, I usually end up cropping to improve the composition of the photo after it is taken. So with a bird, I shoot first, crop later.
When I photograph landscapes, I have a different approach. I often use a tripod and a zoom lens. This allows me to carefully position the scene as I want, making decisions about what to leave in and what to leave out before I push the shutter release. In addition, I may take several images, with different compositions and framing choices. After all, the landscape is not going anywhere soon. Later, I may have little need for cropping.
Poor cropping choices may produce an image that is unappealing. For example, the cropped Mockingbird image below looks weird. Why is the bird’s head stuffed into one corner?
In many of my cropped images, shown above, the bird is off to one side and faces toward the middle of the photo. That is a common choice for a bird photo. But I don’t always make that choice. For example, the Towhee and the Great Egret, shown earlier, face the edge of the picture. In January of 2025 I photographed a juvenile Bald Eagle as it took off from a limb. I cropped the picture to have much more width than height. I feel the Eagle looks as if it is trying to escape from the picture. And I liked the way the tree branches and the Eagle all bend toward the left. I printed this image and it hangs in a frame above Roberta’s desk.

Can Cropping Fail?
If the bird’s image is small relative to the total image, cropping to enlarge the bird a great deal may produce a poor picture. There may not be enough pixels to support a detailed image of the bird, so the result looks grainy and blurred. That is why photographers use big telephoto lenses; to magnify the bird sufficiently before the light reaches the camera’s sensor.
Ethics
Can cropping be unethical? Sure, if you are not honest about what you did. For example, I could take a photo of a Snow Leopard in a zoo. And then crop out anything that might be recognized as part of a zoo, such as bars or a feeding bowl. Then it might look as if I photographed the Leopard in the mountains of Asia. That would be a lie. The ethical failure, however, would not be due to cropping; it would be due to lying. As long as I reveal that the picture was taken in a zoo, I think the cropped photo is ethical.
I could be equally dishonest if I photographed the Snow Leopard using a telephoto lens that allowed me to omit any zoo objects from the picture, without any use of cropping. The dishonesty is not inherent in the photo; it arises if I claim the photo shows something which it does not.
Consider the previous picture of a Swainson’s Hawk being scolded by a Mockingbird. I could transfer that image to Adobe Photoshop and then remove most of the space between the two birds. If I then claimed that the Kingbird came within 6 inches of the Hawk, that would be a lie. I could be honest and reveal that I altered the photo to create a false impression of closeness; but why would anyone want to see a photo altered in this way?
Photographers can always make choices about how an image is created, either before or after taking a picture. Edward Steichen (1879-1973) was a pioneer of photography. In 1903 he took a portrait of J.P. Morgan, the banker. That photo is the most famous image of Morgan, reproduced in hundreds of books and articles. Morgan is staring right at the camera and he looks angry. His black suit merges with the dark background. His left hand grips the metal arm of a chair; but at first glance, it looks as if Morgan is holding a knife. The photo is famous for its drama. It makes Morgan look powerful and dangerous. This is achieved by leaving much of the image in darkness, underexposed or underdeveloped. Use Google to search for
edward steichen photo of JP Morgan
Then scroll down until you see the Wikipedia reference to this. (Some of the other websites crop away part of the chair arm.)
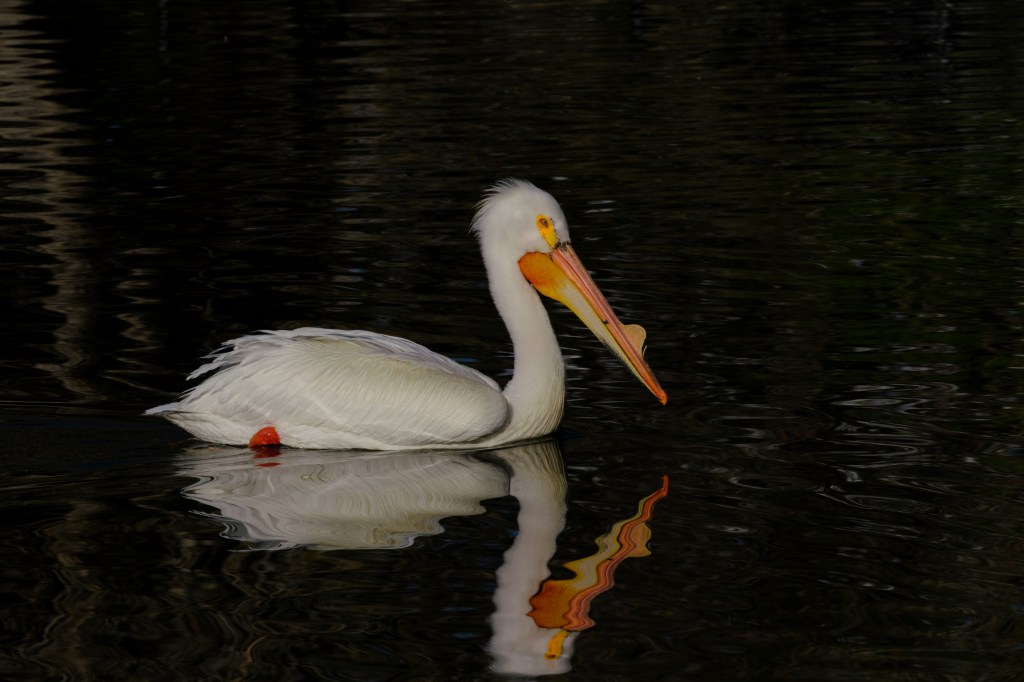
Consider a photo of an American White Pelican at Bishop City Park. Here the issue is not cropping, but exposure. The initial image from the camera shows a lot of feather detail and the reflected bill. Our attention is on the bird because the water looks almost black.
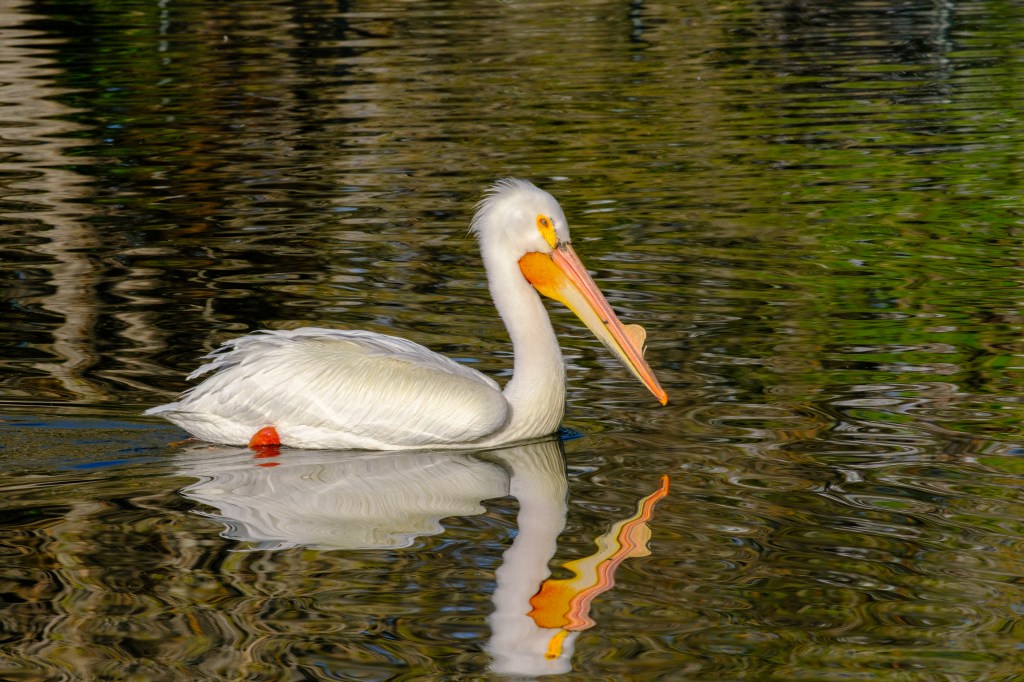
The next picture shows what happens when I hit Lightroom’s “Auto” button to change the exposure. The water is now brighter with a lot of detail, which draws attention away from the bird. This second image looks more like what I saw at 8am in April, when the Park was well lit. Which image is “best?” For what purpose?
Final Comments
Professional photographers and enthusiasts typically catalog and process their digital pictures using software on a home computer. Software choices include Capture One, Topaz, Affinity, Luminar, Snapseed, and more. The dominant applications are Adobe Photoshop and Adobe Lightroom. Photoshop was released in 1990; it is so well-known that the name became a verb, as in “she photoshopped that picture.” It is still popular among photographers and graphic artists. Lightroom appeared in 2017 and is more specifically aimed at photographers.
While the ability to process your own pictures is a gift, it requires a time commitment. On most mornings, Roberta and I go for a one-hour walk. I spend 5 minutes of that walk photographing birds. After a typical walk, I will have about 400 images. When I get home, I import the pictures into Lightroom Classic on my computer. Next I examine each photo. If an image is blurry, or boring, or otherwise useless, I delete it. If I have six images of a sparrow that look similar, I remove five. I do this quickly; in half an hour, just 100 images remain. Now I go back through the pictures, making adjustments. I may increase the overall brightness, darken areas that are too bright, bring out details in shadowed areas, and use commands that sharpen the picture. I almost always crop each image; I trim away unwanted parts and decide where to place the bird in the photo. I keep removing images that are substandard or repetitive. I whittle the results to 40 pictures. Then I electronically label the photos so that I can find them later; a typical label might say “bird, Bishop, Buckley Ponds, Great Blue Heron”. Finally, I rename the photos to something that indicates the location and time they were taken; “Ponds2025Feb.” I use a storage system based on location, such as Buckley Ponds or Mono Lake. In all, a one hour walk will usually mean one hour at my desk.
An Astronomical Endnote
Professional astronomers were early adopters of digital photography. They bought or built electronic light sensors that cost a small fortune. The expense could be justified because it increased the usefulness of big telescopes that were already, um, astronomical in price.
The world’s biggest camera started taking photographs in 2025 at the Vera C. Rubin Observatory in Chile. The camera weighs over 3 tons and has 3,200 megapixels. Earlier I mentioned that the camera I use for birds has a round lens barrel, the rectangular sensor of my camera ignores about 31% of the light that is collected by the lens. But astronomers do not want to waste a third of the photons that are collected by Rubin’s 8.4 meter primary mirror. Instead, the camera captures a nearly circular image using a grid of 189 square CCD sensors. Despite costing 168 million bucks, you cannot use this camera to photograph a bird. It won’t even take a selfie.
